The production pipeline is a chart used to plan out the stages of the creation of any media whether it is a video game, movie or TV show.
The production pipeline is generally a linear map that shows the beginning to the end, usually consisting of pre-production, production and post production. Let's focus though on something like a 3D animated feature film
Pre-production consists of the ideas and build up to creation, generally dealing with story, storyboarding, writing, designs and management of the lead-in to production.Budgets and what people will be working on will be laid out.
Then comes production, the meat of the product itself. This will be modelling, rigging and animation as well as texturing, there may be need for some rendering to test things out.
Finally to put it all together comes post production: Compositing, editing, lighting and rendering. All of these tie the animation together and give it a final pass of quality and ensuring the product comes together as a whole.
Thursday, July 16, 2015
Monday, July 6, 2015
Pose to pose vs straight ahead animation
When it comes to animation, there are generally 2 main types of blocking that are used : Pose to pose and straight ahead.
Pose to pose is when the animator selects key moments in the animation to get an idea of where the animation will transition to.
Pose to pose is when the animator selects key moments in the animation to get an idea of where the animation will transition to.
A general pose-to-pose animation
Straight ahead is when the animation is done linear and from frame to frame in order. So 1-2-3-4-5 etc.
Pose to pose offers many benefits over straight ahead, including getting timing right, being able to show the director/animation lead where the animation is going before the in-betweens, gives a better overall direction the animation is going and will save time in the long run. Pose-to-pose is the preferred animation type for 3D animation.
Straight ahead is still useful, but the animator has to have a good idea of what he is leading his animation into. A straight ahead animation may also taper and change shape/size if the animator is not careful about each frame. The method can sometimes be quicker, but will be more work if the animation does not turn out correctly.
Sunday, June 28, 2015
Things to consider for animation
When it comes to animation, there is much more than just drawing frame after-frame and expecting something great to appear. There are generally numerous things to consider when animating any object, person or animal.
For starters, rather than merely guessing how something animates, it is much more useful to reference and study the subject at hand. What your mind assumes to be correct may be missing when if comes down to actually animating. The human eye can and will detect faults as it understands how something moves.
Example video of reference for exercising animation
Let us consider the following when it comes to reference:
Shape/size/weight: It is important to know how heavy an object is as it animates, as a bowling ball on a rope will have more weight than say a tennis ball on a string. Knowing the weight of an object will allow you to judge how fast the object moves, how much time it has to get to a new position and how quickly it can start and stop.
Timing: Timing is key to believability as something that moves too fast or too slow can make an animation seem out of place. Blocking out the time objects move from pose to pose will allow you to get a feeling of how the frames in between will move and where they should be. Knowing how many frames it will take for an object to go from position A to B is important to ensure the objects mass and shape fit.

For starters, rather than merely guessing how something animates, it is much more useful to reference and study the subject at hand. What your mind assumes to be correct may be missing when if comes down to actually animating. The human eye can and will detect faults as it understands how something moves.
Let us consider the following when it comes to reference:
Shape/size/weight: It is important to know how heavy an object is as it animates, as a bowling ball on a rope will have more weight than say a tennis ball on a string. Knowing the weight of an object will allow you to judge how fast the object moves, how much time it has to get to a new position and how quickly it can start and stop.
Timing: Timing is key to believability as something that moves too fast or too slow can make an animation seem out of place. Blocking out the time objects move from pose to pose will allow you to get a feeling of how the frames in between will move and where they should be. Knowing how many frames it will take for an object to go from position A to B is important to ensure the objects mass and shape fit.

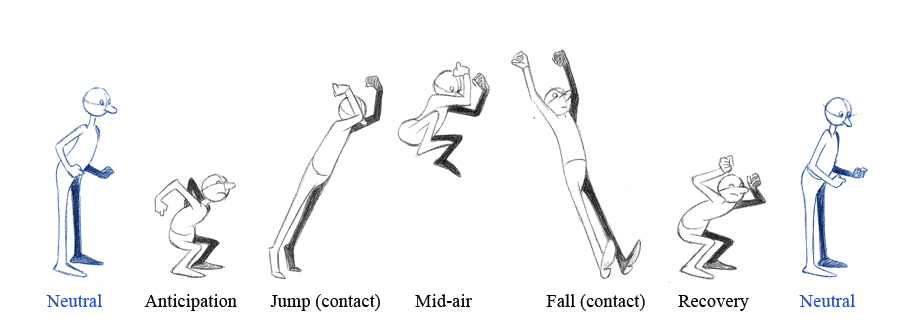
Blocking a star jump
Animation: Finally, understanding key rules of animation such as overlapping, squash and stretch (where necessary) , slow ins and outs, anticipation etc will add to the overall appeal of the animation. Sometimes the character being animated can have all their personality in just their animations alone, without the need for facial expression or even speech. A great lumbering animation will show a character of strength whereas a quick snappy animation can show speed and cunning.
Being able to draw is not 100% necessary in the blocking stages as long as the movement is shown clearly, though for more detailed animation with expression, exaggeration and minor details it certainly helps.
Animation test for Disney's Tarzan
Using references, understanding and researching the material and blocking out animation before diving right into the the final cut is key to ensuring the animation will be successful.
Saturday, June 20, 2015
Animations in games
Here is a great video on animation in games by "Turbo Button"
Animation in action games
It talks about things to consider in action games when they are animated.
Animation in action games
It talks about things to consider in action games when they are animated.
Shaders, let's shed some light in this.
In 3D shaders are extremely important in giving polygons more information and to flesh out an object, rather than it being just a simple flat image.
When a polygon starts out, it has no values or anything overly distinguishable other than often a single colour. Shaders add the details, colouring and material to the polygons and without them they will be mostly lifeless.
The 3 main shaders used are:
Colourmaps
Specular maps
Bump/Normal maps.
Colourmaps are exactly as they are implied. They add colouring to the polygon surface, whether it is a hand painted texture or a photograph. The colourmap sets the overall colour of the object.
Specular Maps are another layer added to the colourmaps to bring out reflective highlights. The highlights are depicted by a black and white image, where the whitest values are the lightest/most reflective and the blackest values are the dullest/ least reflective.
Bump/Normal maps are a shader used to give depth to the colourmap and show details in the surface. A bump map works similar to speculars, in which the whites are higher surface peaks and black is a deeper surface. Normals are a more accurate version of bump maps and allow for greater detail, but rather than using black and white it uses Red, green and blue allowing more angles to be picked up. Generally normal maps are extracted from higher polygon meshes and baked onto a lower poly version giving the illusion of the lower poly model having more detail than it does.
If we were to make a golf ball, we would use a basic white texture for the colourmap, a patterned bump map of small circles repeated and then lightly highlighting the ball with a specular with a light amount of noise/dither to bring out the shine ( or lack of shine ) on the ball. To add even more detail, a secondary colourmap can be added with dirt and marks. The dirt and marks can then be softened/randomised by creating an alpha channel and painting white/black for where the ball should be dirtier/scuffed.
Monday, June 15, 2015
Talking Topology
Topology is a term used in 3D graphics to describe how a mesh is sculpted and the overall cleanliness of the polygons. Essentially it comes down to using polygons correctly and not wastefully, ensuring they are readable, ensuring they are optimised and ensuring there are enough for objects to bend.
By using good topology;
- The mesh is easier to read
- The mesh flows correctly to the shape of the object
- The mesh can use less expensive polygons
- The mesh is easier to unwrap for texturing
- More polygons in the right places will ensure natural movement and bending of polygons
- Less wasted resources
- Something boxy does not need as many triangles as something organic as the shapes are easier to define, so polygons can be spared.
- Models design with animation in mind will work correctly.
- Shapes are correct, contours flow together.

Here is an example from clevermusings.com of good vs bad topology. As you can see the polygons on the left model are poorly placed and do not flow very well, whereas the model on the right is clean and uses polygons correctly to fit the shape of the face without resorting to using more polygons to fill in the gaps.
Monday, May 4, 2015
Fixing what is broken.
Sometimes things do not go as planned or a model does not work as you'd hope, so re-doing it is all you can do to fix the problem.
I was not happy with the initial head, so I re-did it from scratch

I was not happy with the initial head, so I re-did it from scratch
Well within budget and matches what I wanted the character to look like. Happy days.
Subscribe to:
Posts (Atom)